IMPORTANT: You can read the official documentation that Microsoft has on this topic from the following link (url).
If you’ve used Power Query or Power BI before, you’ve probably seen the “Merge” button which displays a window like the following:

and this let’s you join 2 tables (or queries), and one of the questions that I get pretty often is: “What’s up with all of those ‘Join Kinds’ ? when should I choose which one?”
and that’s why I’m writing this series of blog posts around this specific topic from a purely practical standpoint so you can get a glimpse of what each one of those merge operations can bring to the table.
In this, Part 1, we’ll start with the default join which is the Left Outer Join.
Source Data
For this one, we’re going to start with 2 tables:
- This is our Daily Sales Table

- Our Products Table

Scenario 1: VLOOKUP style
As you can see, our Sales table has the ProductID, but we would like to actually use the Product Name instead of the ProductID, so how do we make that possible?
You can follow along by downloading the sample file from the button below:
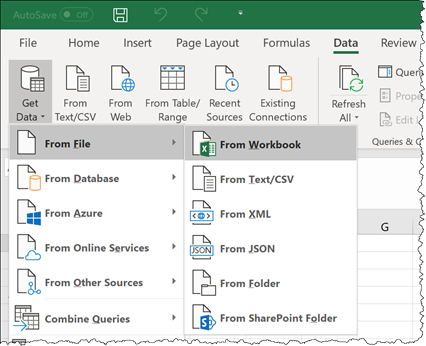
The first thing that we need to do is load both of those tables to Power Query / Power BI. To do that, we simply go to Data > Get & Transform Data > Get Data > From File > From Workbook:

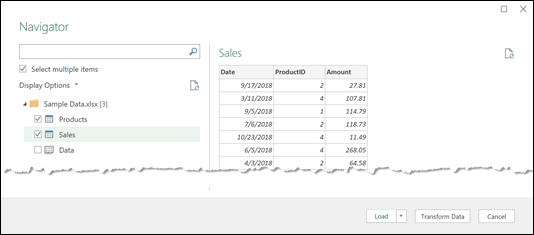
then we find the file that we downloaded (with the name of Sample Data.xlsx). We then select the option to “Select multiple items” and we select both the Products and Sales table:

and then we click on ‘Transform Data’ or ‘Edit’ depending on what version of Power Query / Power BI you might have.
That should land both of your tables inside the Power Query editor as shown below:

Doing the Left Outer Join
At this stage, we’re ready to click on the ‘Merge Queries’ button that you see in the top middle of the previous image. Be sure to select, from the dropdown, the option to merge queries as new.

Now we simply get the new Window to do the Merge operation and in here we select our first table to be our Sales Table, we select the ProductID from that one, and then we select our second table to be our Products table and select the ProductID from that one as well as shown below:

by default, you’ll see that the Join Kind is set to Left Outer, so all we need to do at this stage is simply click OK.
That will get us the following result:

Every time you do a Merge / Join Operation, 2 things happen but only one of them is immediately obvious:
- A new Column gets created – you can see that it uses the Name of what I called before the Second table (named Products).
- The join occurs – when we defined both the Join Kind and the “First” and “Second” table, we basically defined how our output table should look like. In our case, LEFT OUTER means “keep every row from the first table” or, as the label states, “all from first, matching from second”.
With that newly created column, that has table values, we can expand it so we can get the Product Name that we’re looking for like this:

and the result will look like this:

This is a similar result to what you might get when you use VLOOKUP and that’s usually the comparison that you get when using this, but this option is MUCH more powerful and goes way beyond what you can do with VLOOKUP.
Scenario 2: Group By style
Let’s follow almost the same steps that we did with the first Scenario, but instead of using the first table to be the Sales table, let’s switch it up. What if my first table was the Products table?

The result of that will look like this:
 Since our first table is the Products table and not the Sales one, our base gets to be Products Table and that’s why we only see 4 rows.
Now, instead of expanding the records on the Sales column, let’s do an aggregation:

and with that we’ll get the total Amount by Product:

This is a similar result to what you’d get if you wanted to do a ‘Group By’ operation using the Name of the Product or simply the ID of the Product.
In conclusion, it DOES matter big time which one is the first table and you can leverage this to your advantage depending on what you’re trying to accomplish.

 Miguel Escobar Published January 3, 2019


Ohh! Not many comments here. Just wanted to thank you for this series of articles. I have a good background in database design using Access and this makes lots of sense.
Hi Dan – What I was hoping to see here was “where” to the joins take place? If i’m doing a import mode from a DB AND a Excel file does the merge get pushed to the DB or does it happen on my local PBI desktop?
It happens only in PBI
It depends on your privacy levels. If you have the highest privacy level then they’ll be done locally, otherwise those queries will be sent to the database as “WHERE” clauses
Hello Sr great post, I had a situation I want to used the left join, but only bring the firts matching row, just like in regular excel this is because I need the latest date of purchase for an item , not all of them, is there any way to do this?
There’s a few ways! But all of them are out of the scope of the merge itself. You can either prepare a table that will not contain duplicates and then do the merge against it, or after you do the merge you need to use your custom function to grab the row that you’re looking for based on your own logic.
I usually recommend going for the first one – prepare a table without duplicates and do the merge against it