IMPORTANT: You can read the official documentation that Microsoft has on this topic from the following link (url).
If you haven’t read Part 1 of this series, I highly recommend that you read that prior to this post.
In that previous post, we went over the Left Outer Join and some basics on how Joins / Merge operations work inside Power Query / Power BI where the position of the table (first one or second one), the columns being used of the join and my desired goal (aggregation vs expand operation) all have an impact on the whole Merge experience.
In this , Part 2, we’ll go over the Right Outer Join from a purely practical standpoint.
Source Data
Similar to the previous post, we’ll be using 2 tables this time:
- ExportedData – imagine that this is a table that gets exported from a global ERP system and, as such, it holds the data for not only my region but basically all of the regions that you can possibly image. Sadly, we’re unable to filter the data from the origin, so we need to do it somehow with Power BI / Power Query

- SelectionTable – this is a simple list of the combinations of Regions and Category codes that I’m interested in and the only ones that I’m after.

The Goal
We have only 1 goal and that is to basically create a subset of the data from the ExportedData table that only has the data that we’re interested in and that should look like this:

The Solution
The following is a step by step process on how we can accomplish our desired result with nothing but a few clicks. No code needed – just the use of the Right Outer Join inside of Power Query.
Loading the Data
You can follow along by downloading the sample file from the button below:
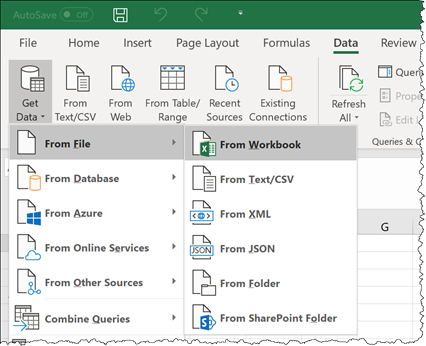
The first thing that we need to do is load both of those tables to Power Query / Power BI. To do that, we simply go to Data > Get & Transform Data > Get Data > From File > From Workbook:

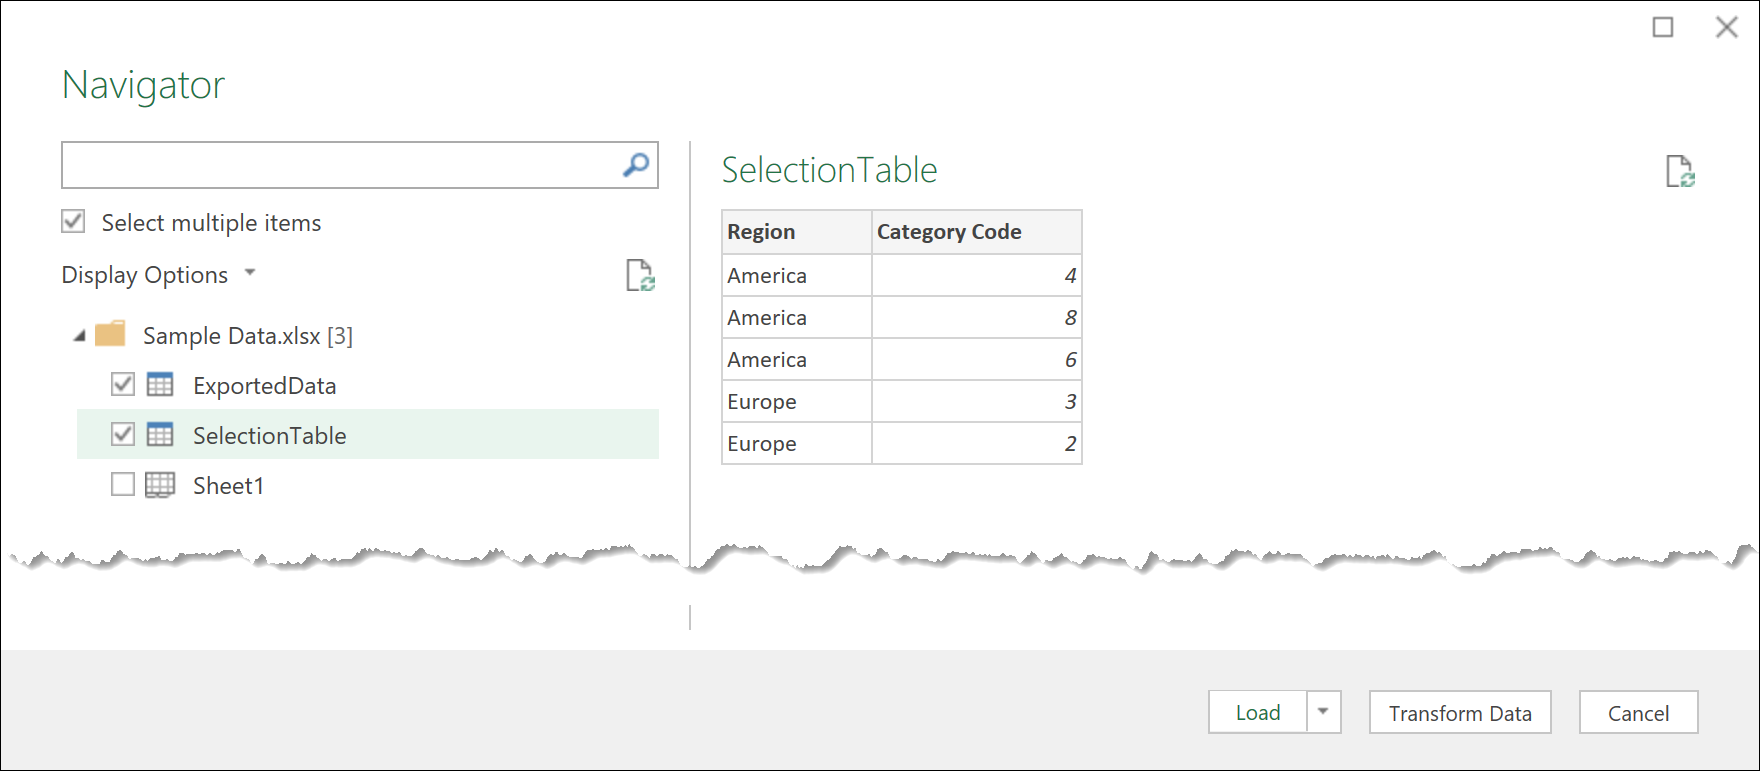
then we find the file that we downloaded (with the name of Sample Data.xlsx). We then select the option to “Select multiple items” and we select both the ExportedData and SelectionTable tables:

and then we click on ‘Transform Data’ or ‘Edit’ depending on what version of Power Query / Power BI you might have.
That should land both of your tables inside the Power Query editor as shown below:

Doing the Right Outer Join
At this stage, we’re ready to click on the ‘Merge Queries’ button that you see in the top middle of the previous image. Be sure to select, from the dropdown, the option to merge queries as new.

Now we get a new Window to set the Merge operation and in here we select our first table to be the ExportedData table and the second table should be the SelectionTable.
Here comes the fun part, we are not going to only select 1 column from each table, but actually 2 columns. Can you even imagine doing this with traditional Excel??
I know that if you pulled a MacGyver on it, you’d probably concatenate fields and then try to use the concatenated field as the key for your VLOOKUP or INDEX/MATCH in Excel, but this is no longer needed with Power BI / Power Query.
In order for you to select multiple columns, you’ll need to hold the Ctrl key and then left click on the columns that you desire. Notice how right next to the name of the column there should be a number, which denotes the order in which you selected the fields – the order should be the same across both tables (the first one and the second) and last, but not least, go ahead and from the Join Kind dropdown, select the Right Outer Join as shown below:

After hitting OK, you’ll go back to the Power Query Editor and you should be able to see it like this:

Again, similar to what I mentioned in the previous post, I get a new column called SelectionTable and something else happened – the actual Join / Merge operation did a sort of a Filter and what we see is a subset of the original ExportedData table.
As the label for this join states, we get “all from second, matching from first” which means that we kept only the rows that existed on the SelectionTable that had some sort of match on the first one, which is exactly what we were after.
Final thoughts
I usually call this and other Join types a way to use Clever Filters because they help you create some really dynamic ways to exactly get the data that you need to filter in or out.
I even blogged about this a while ago and you can check that blog post by clicking on the image below:
![Power-BI-Clever-Filters[1] Power-BI-Clever-Filters[1]](https://thepoweruser.com/wp-content/uploads/2018/12/Power-BI-Clever-Filters1.png)

 Miguel Escobar Published January 8, 2019


Just curious why you don’t simply use an INNER join type for this merge?
Good call! I believe I made the sample data also ideal for an inner join. Maybe I should’ve added a row in the right table that doesn’t exist in the left table so you could see the difference.
Thanks for the feedback!