IMPORTANT: You can read the official documentation that Microsoft has on this topic from the following link (url).
Similar to the previous posts in this series, I highly encourage you to read the first 4 Parts ( 1 | 2| 3 | 4 ) that I’ve published so far around Merge / Joins inside of Power BI / Power Query.
So far I’ve covered:
- Left Outer Join
- Right Outer Join
- Left Anti Join
- Right Anti Join
In this, Part 5, we’ll go over the Inner Join from a purely practical standpoint.
Source Data
Similar to the previous posts, we’ll be using 2 tables this time:
- OnlineSales – we sell some of our products using an online store hosted on Shopify and this is the export that Shopify gives us

- TeleSales – we also have a different channel that we call TeleSales, which is for everything that happens outside of the Online Channel

The Goal
We need a table with only the accounts (customers) that had sales in both OnlineSales and the TeleSales table.
The result that we’re looking for should look like this:

The Solution
The following is a step by step process on how we can accomplish our desired result with nothing but a few clicks. No code needed – just the use of the Inner Join inside of Power Query / Power BI.
Loading the Data
You can follow along by downloading the sample file from the button below:
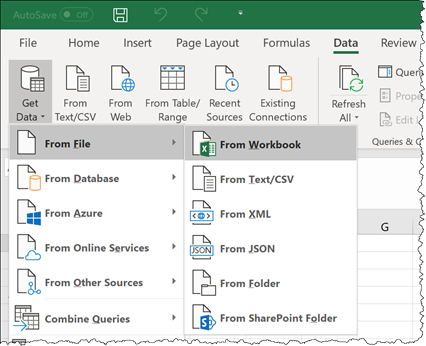
The first thing that we need to do is load both of those tables to Power Query / Power BI. To do that, we simply go to Data > Get & Transform Data > Get Data > From File > From Workbook:

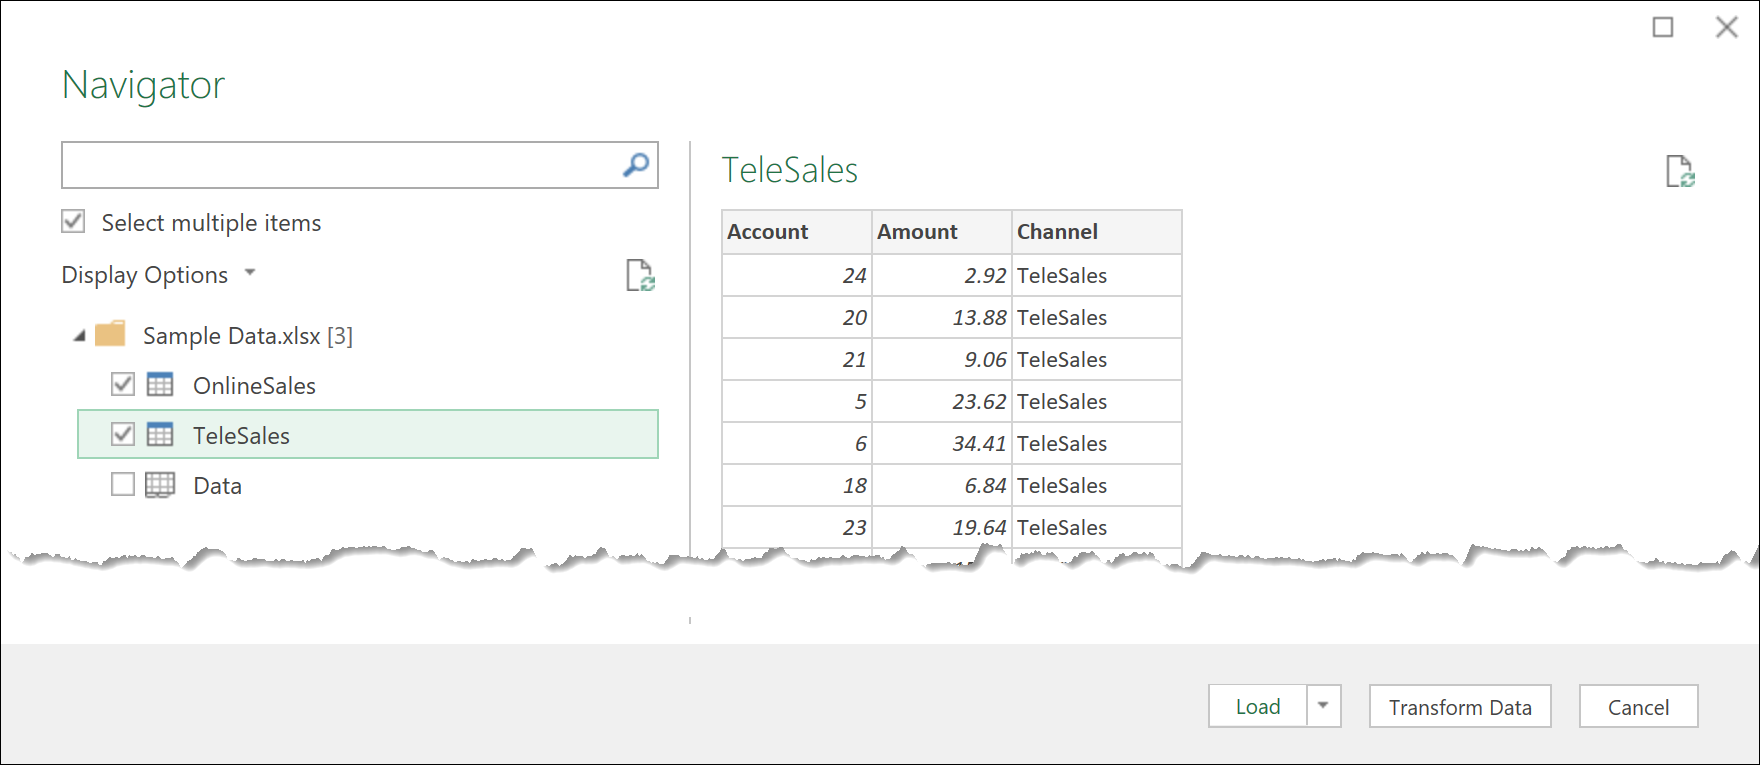
then we find the file that we downloaded (with the name of Sample Data.xlsx). We then select the option to “Select multiple items” and we select both the OnlineSales and TeleSales tables:

and then we click on ‘Transform Data’ or ‘Edit’ depending on what version of Power Query / Power BI you might have.
That should land both of your tables inside the Power Query editor as shown below:

Doing the Inner Join
At this stage, we’re ready to click on the ‘Merge Queries’ button that you see in the top middle of the previous image. Be sure to select, from the dropdown, the option to merge queries as new.

Now we get a new Window to set the Merge operation and in here is completely up to you which you want to pick as the first or second one. In my specific case, I chose to go with Online Sales as the first table and TeleSales as the second one.
For the columns that you need to select on each table, just select the Account column on both and then choose the Inner from the Join Kind dropdown as shown below:

After hitting OK, you’ll go back to the Power Query Editor and you should be able to see it like this:

OK – Let’s do a quick summary to understand what happened or how to translate that result into something that we understand.
We started with our OnlineSales table that has 30 rows. The TeleSales has 16 rows and this new ‘Merge 1’ query only has 13, which means that there are only 13 accounts that had sales in both the OnlineSales and TeleSales tables.
There we have it! an easy translation as to what Power Query did.
Expanding the Newly Created Column
Something pretty helpful in this specific case is that you can expand that newly created column to get the Amount for TeleSales in our table as well the already available Amount column for the OnlineSales:

and the result of that will look like this:

Final thoughts
This is quite different to the joins that we’ve seen before because it relies on having matches on both tables, not relying completely on just the first one or the second one.
I’ve used this quite a few times and it’s mainly to make sure that we only Load the data that we’re really interested in rather than for more of the ‘Clever Filters’ that we’ve seen before.

 Miguel Escobar Published January 17, 2019


