 Miguel Escobar Published November 3, 2019
I’ve just finished moving from HubSpot to ActiveCampaign.
While HubSpot seems to be an amazing platform for anyone into data analytics, it simply wasn’t cost-effective for my business, not to mention that some of its features seem really limited to the point where I wasn’t even using them.
The migration from HubSpot to ActiveCampaign wasn’t an easy task, but the ActiveCampaign team is quite experienced with situations like mine – it appears that I haven’t been the only customer who ditched HubSpot for AC.
They took care of most of the migration, but at the end I did have to do some cleaning on my lists, export the lists of contacts from HubSpot and then upload that into ActiveCampaign. I have several lists in both English and Spanish, and matching the names of the columns in HubSpot and ActiveCampaign was a nightmare.
Just check out this export from HubSpot that has 272 columns!
Out of those 272, I only need 10. But here’s the thing, I also have a bunch of other exports from HubSpot that might have from 80 – 300 columns and I always need only 10 specific columns.
Here’s where Power Query comes to the rescue!
My Tasks: Select / Keep and Rename Columns
My tasks are simple.
- I need to reduce the number of columns to only those columns that I need
- Rename the columns selected to the names that I use in ActiveCampaign to make the import easier
This sounds pretty simple and I have 2 options:
- Manually do these steps in Power Query by selecting the columns within the query and rename them afterwards
- Use a helper table to make things a bit more flexible in case I need it
I’m going with option 2. Let’s start. You can follow along by downloading the file from the button below:
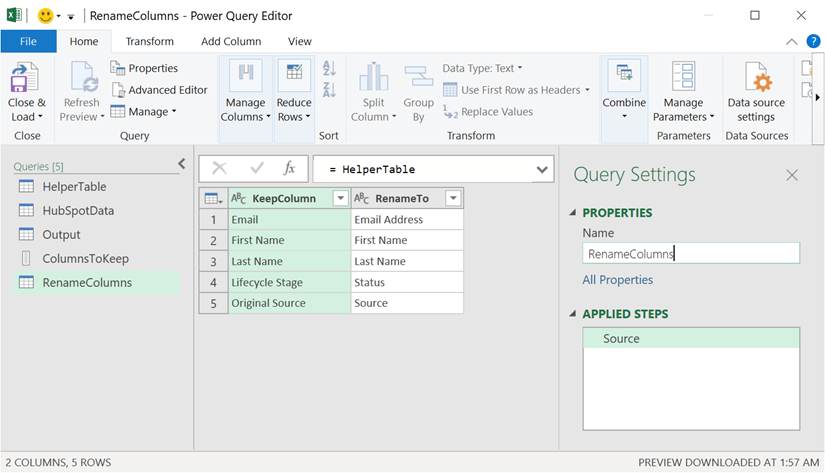
Using a helper table to drive transformations
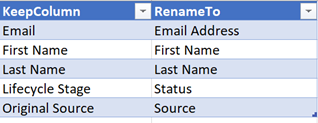
I created the table above where you’ll see 2 columns:
- KeepColumn: the name of the column from the original export that I’d like to keep
- RenameTo: the new name of the column that I want to keep
Step 1: Keep Columns
The first thing that we need to do is have both of these tables inside the Power Query Editor. You’ll notice that the file already has both of them to simplify the process, but remember that you can connect to pretty much any source with Power Query.
The queries that we have as our source queries are:
- HubSpotData: the actual export from HubSpot
- HelperTable: the table that I created
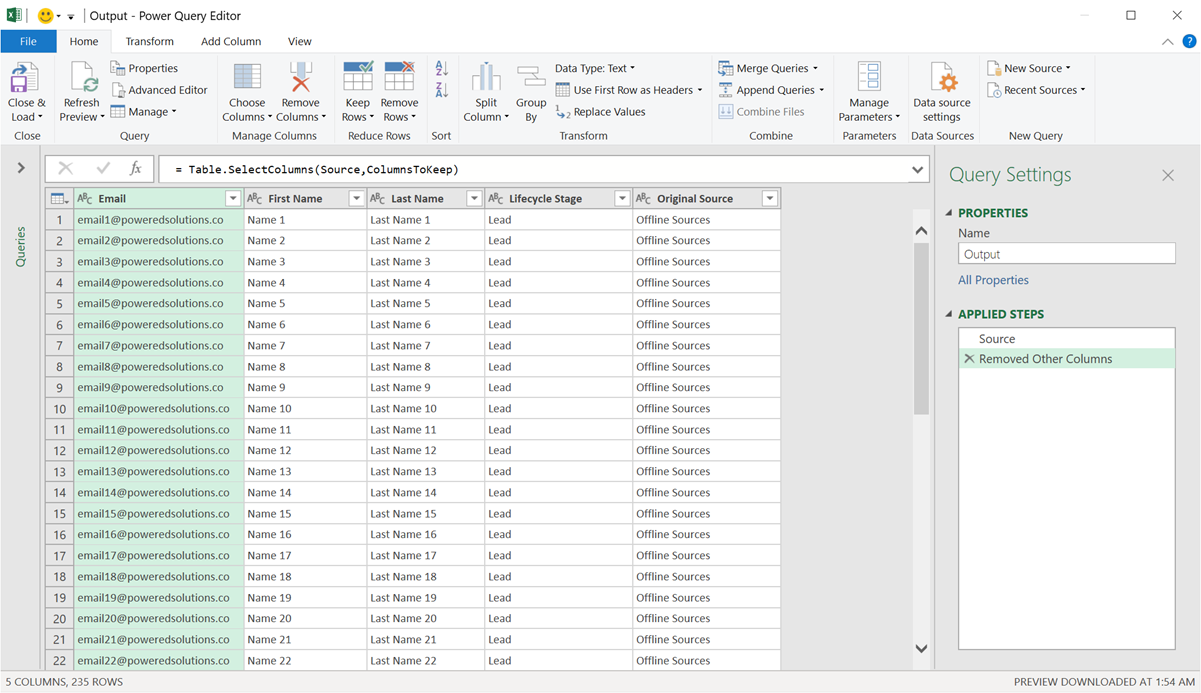
I created a reference query from the HubSpotData to create a new query that I’m naming Output.
The next thing that I’ll do is simply right click on any column of the table and hit the “Remove Other Column” option:
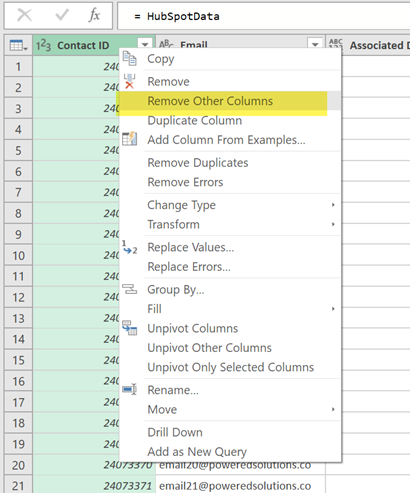
Check out how the result of that operation looks like:
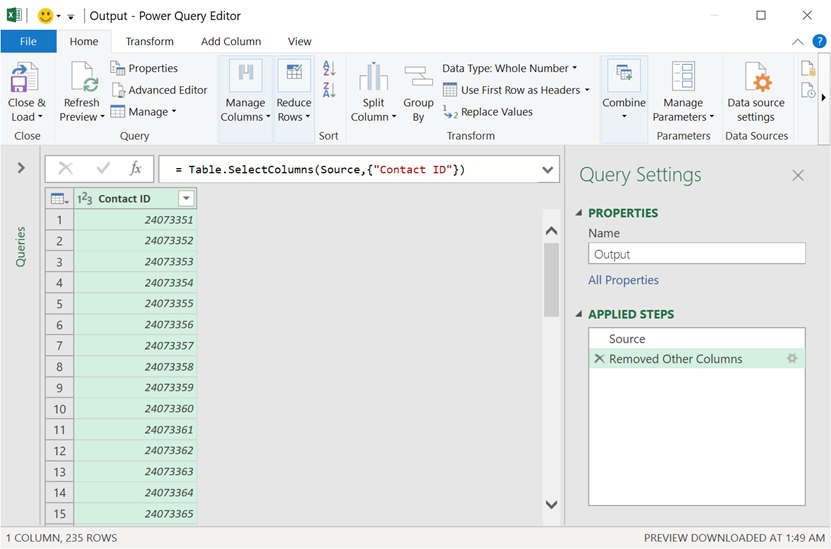
In the formula bar you’ll see that it uses a function by the name of Table.SelectColumns which requires a Table and then a list with the names of the columns to keep. Since I only wanted to keep one column, it only has one name in there, but it can have as many as you’d like.
Let’s go back to the HelperTable query and create a reference from it by simply right clicking and hitting the reference button:
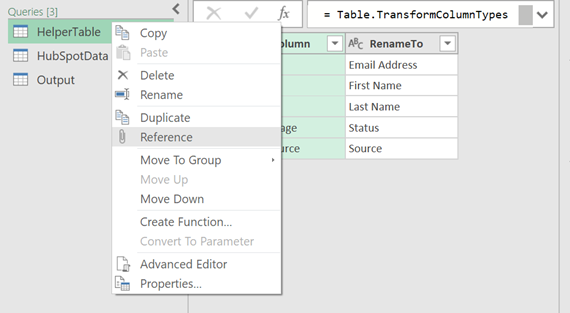
This is where things get super interesting. Let’s rename this new query to ColumnsToKeep.
Right click on the KeepColumn column and hit the Drill down option:
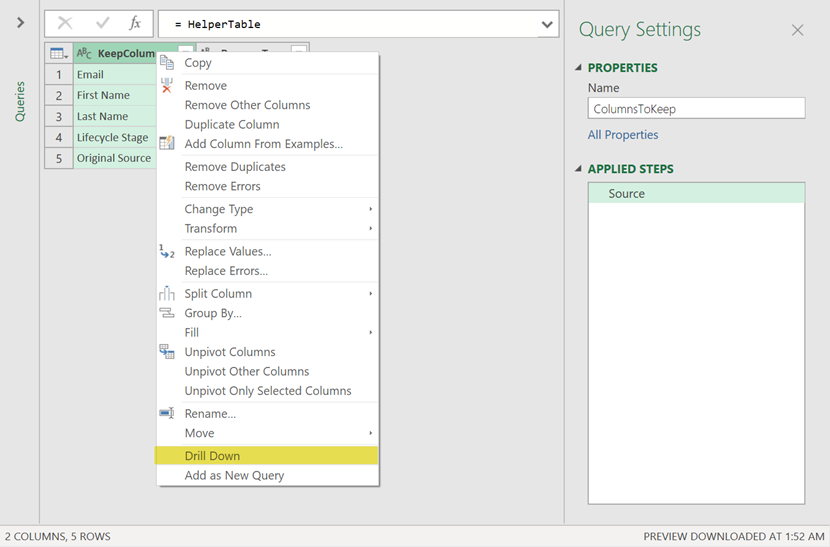
This will extract the column from the table and transform it into a list as shown below:
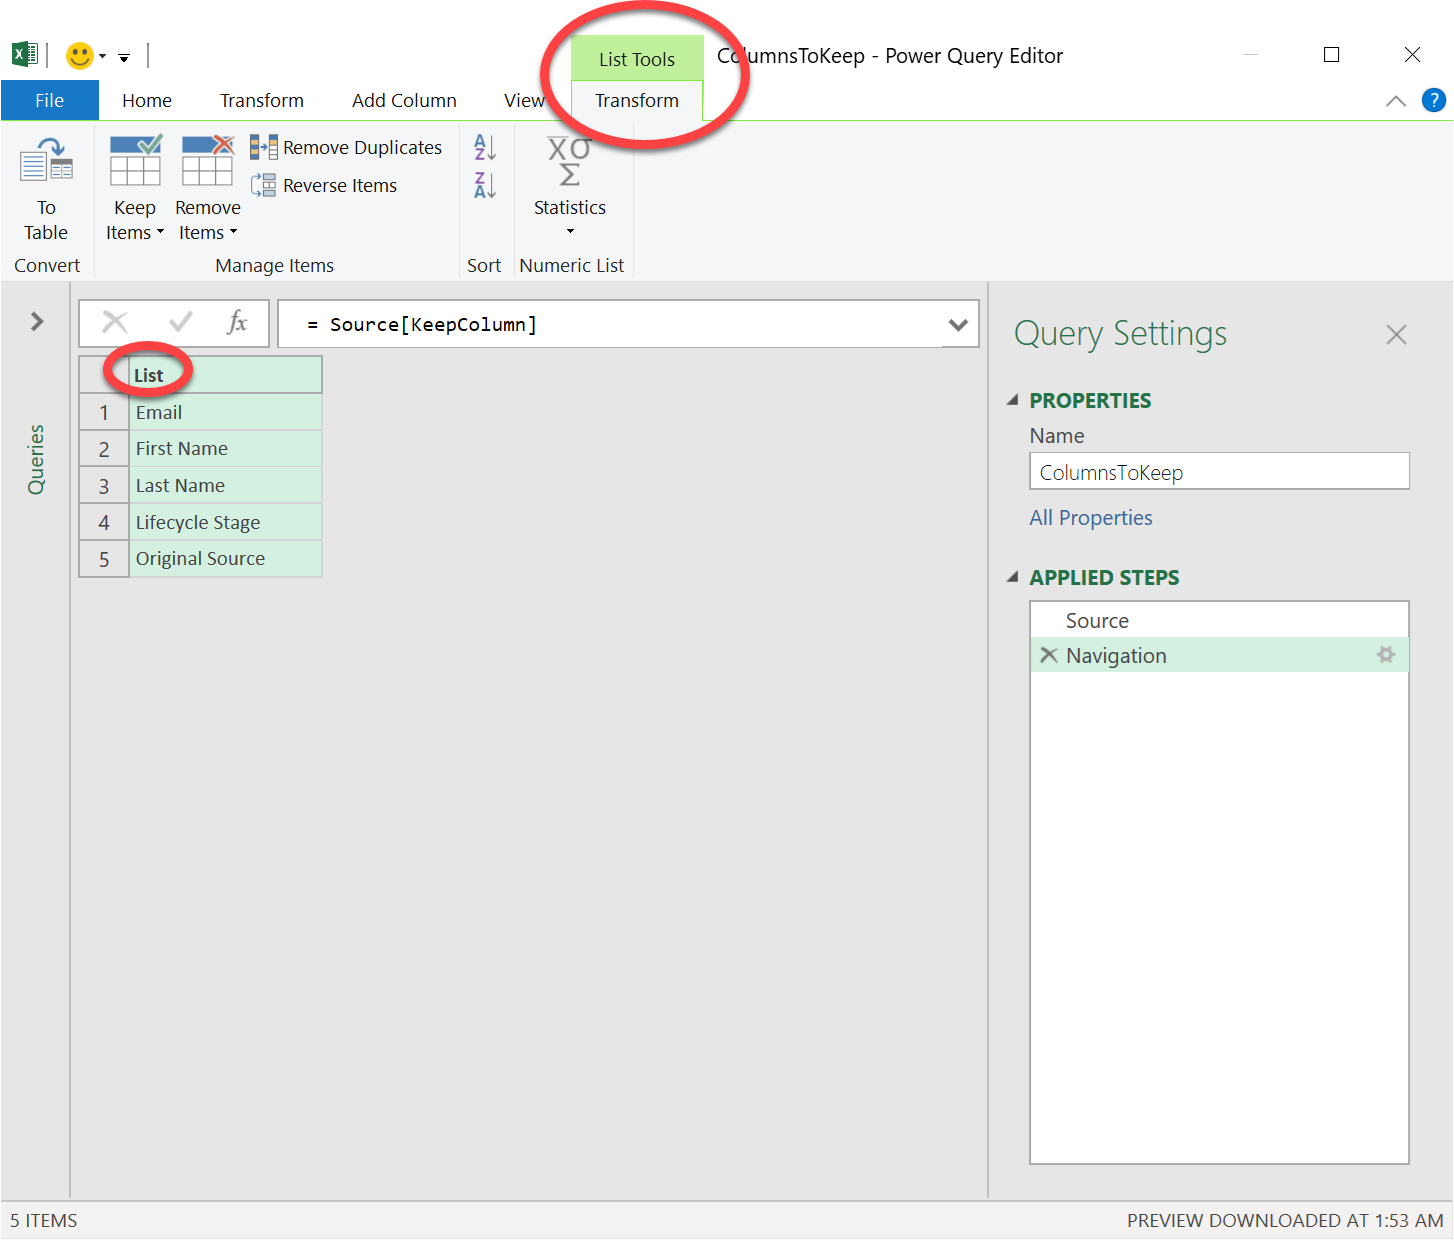
Now, let’s go back to the Output query and let’s replace the second argument of the Table.SelectColumns function with the name of the query that we just created – ColumnsToKeep. This is how that will look like:
Now we can move to step 2 where we can rename these columns.
Step 2: Rename columns
Let’s go ahead and rename any of the columns inside of this query and let’s see the result that we see in the formula bar:
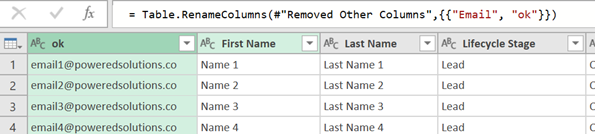
Notice that this function (Table.RenameColumns) uses similar arguments. First it needs the Table (#”Removed Other Columns”) and then it needs a list of lists with paired values, where the first one is the current name and the second value is the new name of the column. That’s why we see “Email” as the first text string and “ok” as the second one.
Similar to what we did before, let’s create a reference query from the HelperTable query and let’s name this new query RenameColumns.
Now we can go ahead and simply create a custom step by clicking the fx icon in the formula bar and let’s use the following formula:
= List.Zip( Table.ToColumns( Source ) )
EDIT 1/Dec/2019: you can also just use Table.ToRows (Source) as suggested by ahmad nouman in the comments section
Which will look like this:
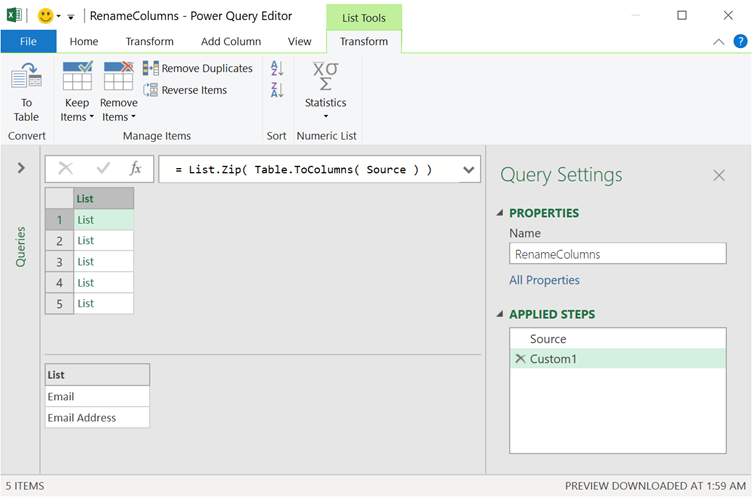
What did this formula do?
- It first transformed the table into a list of lists (using Table.ToColumns)
- And then it “zipped” or paired up the values from within those lists into multiple lists inside of a list (using List.Zip)
We can now go back to the Output query and replace the second argument of that Table.RenameColumns function to be like this:
= Table.RenameColumns(#”Removed Other Columns”,RenameColumns)
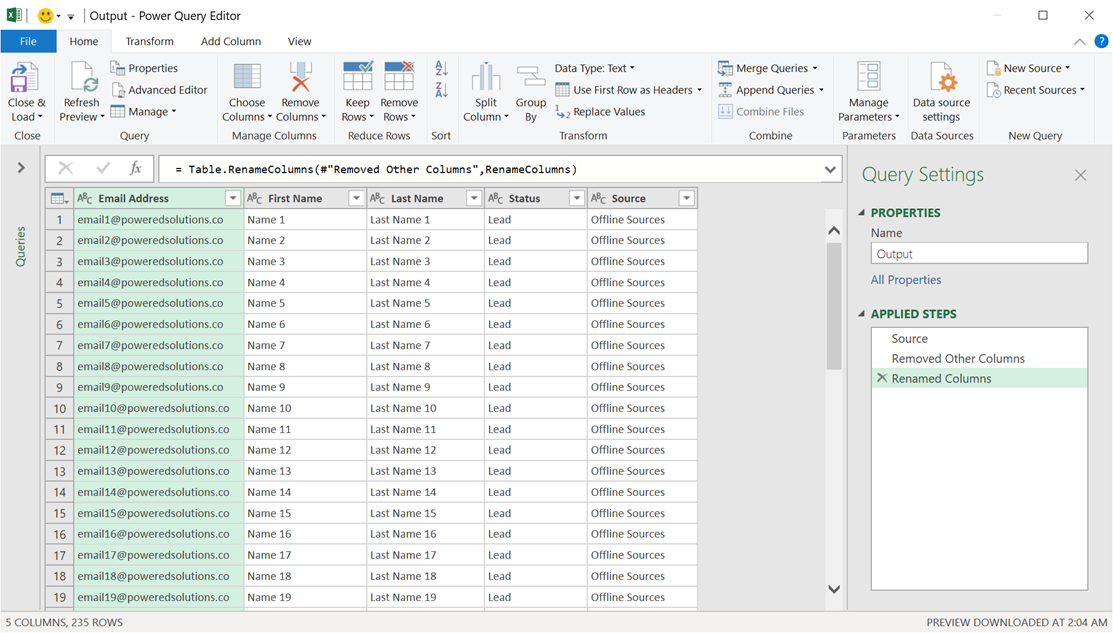
And voilá! We have our solution ready
When should you use this?
Whenever you feel the need to!
I used this because I was going back and fort checking what custom fields I had and which fields I was missing, so it was easier for me to change the values from the helper table than to go inside the Query Editor and change those manually.
It is recommended for “exploration” or this one-off solution where I had to do some simple cleaning and use the output of it for an import to another system, but if you plan to publish your solution in the Power BI service then it is recommended that you explicitly define these transformations in your output query without using a Helper – just by selecting the columns and then manually renaming each column as using a helper column could bring some trouble depending on the privacy levels of your data sources and how you plan to combine them.
Other than that, this thing saved me so many hours of work in the past that I had to share this.
Bonus tip: re-order your columns
Did you know that when you try to re-order the columns of your table it uses the function Table.ReorderColumns?
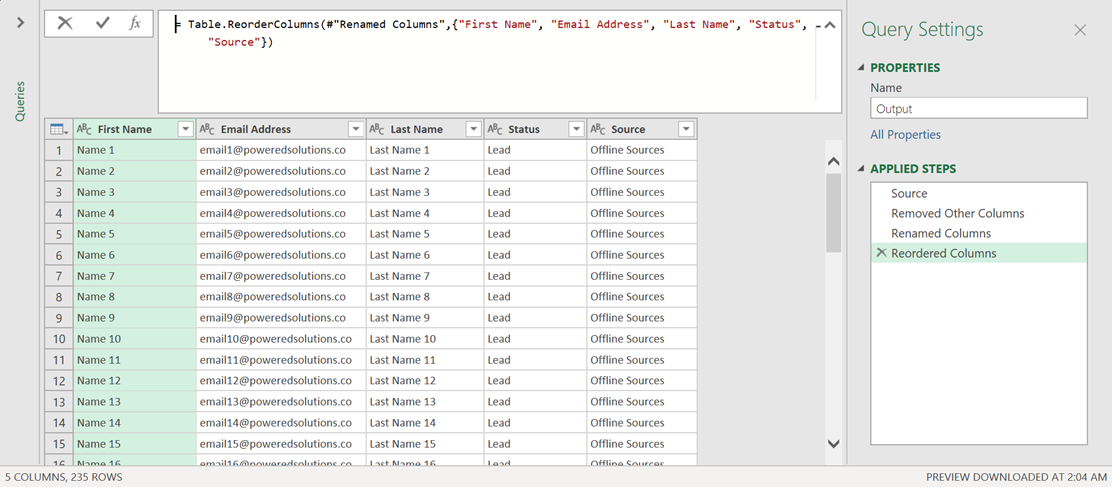
Similar to the previously shown functions, it also needs a table as its first argument and the second one is a list with the names of the columns in the order where they should appear.
Here, you can replace that second argument as you wish in the event that you need your output table to also have a particular order or columns. You can use a similar technique to the one where we just did a simple drilldown over a column and use that list of column names.
There’s a bunch of other functions that work this way and once you start getting the grasp of how tables and lists work in Power Query, you’ll be able to make the most out of Power Query.


Dear Sir, your formula above “List.Zip( Table.ToColumns(Source))” which has two parts may be replaced by just “Table.ToRows(Source)” resulting in the desired paired list.
You are absolutely right. Thank you!
This is just so clever, beyond words. The uses that can be applied using the approaches as described are immense. Brilliant. Thank you so much
Thank you, this is very helpful.
I am getting the error Expression.Error: We expected a RenameOperations value at expression Table.RenameColumns(#”Pivoted Column”,ColumnNameTable). I followed all the instruction, not sure what I am doing wrong Can you please help me?
Hey! I’m not exactly sure where you got the “Pivoted Column”. That may be the culprit Of it all. I highly encourage you to download the sample file and follow along with that file before trying to apply it to your own datasets
Thanks so much for this tutorial, it was just what I was looking for. I was struggling with the large amount of columns that showed the Dynamics 365 query.
Why do you use reference queries instead of the original one?
Hey! It’s just to keep myself organized but you can do everything in one query if you prefer it that way
Thanks for this solution!
Hello Miguel,
This was very helpful – thank you. I have created a mapping table which works well in testing when I load both the file with columns to be renamed and the mapping table and reference Table.RenameColumns(Table Name,Mapping Table).
My issue is that I have many people send me different files from different systems and I have no control over the format provided. I want to create a large mapping table of all available column renaming options and rename five fields I need before I exclude all other columns and reorder columns. I am experiencing an error when I attempt this because there are additional columns in my mapping table which are not represented in my columns-to-be-renamed-file. Any ideas?
Columns-to-be-renamed Example:
Column Names:
-Transaction ID #
-Category
-Unit Cost
-Units
-Store
Mapping File Example:
Column A/Column B:
-Transaction ID #/ID Number
-Category/Fruit
-Unit Cost/Price
-Units/Number
-Store/Location
-Me/You
Error showing:
Expression.Error: The column ‘Me’ of the table wasn’t found.
Details:
Me
If you have any ideas to accomplish what I am attempting that would be great!
Thanks,
I’d probably try to create a function that takes both lists of fields and outputs the correct one that needs to be used. You can use some sort of Merge operation with an INNER join and then get the list of just the fields that will be remapped and use that list as your Table.RenamColumns 2nd argument